随着项目规模的增长,把所有构建逻辑都集中在一个 CMakeLists.txt 文件里,会让项目越来越难维护。接下来几篇我们讨论构建项目的策略,并限制变量的作用范围和副作用,目的是降低代码的复杂性、简化项目的维护。本文将把一个项目分割成几个范围有限的 CMakeLists.txt 文件,这些文件将使用 add_subdirectory() 命令进行处理。
注意:本文示例在 CMake 3.5 及以上版本中有效,并已在 GNU/Linux、macOS 和 Windows 上测试过。
由于我们希望展示和讨论如何组织一个复杂的项目,所以需要一个比 “hello world” 更复杂的例子:我们的代码能够计算全部 256 个基本细胞自动机,例如规则 90(Wolfram 编码):
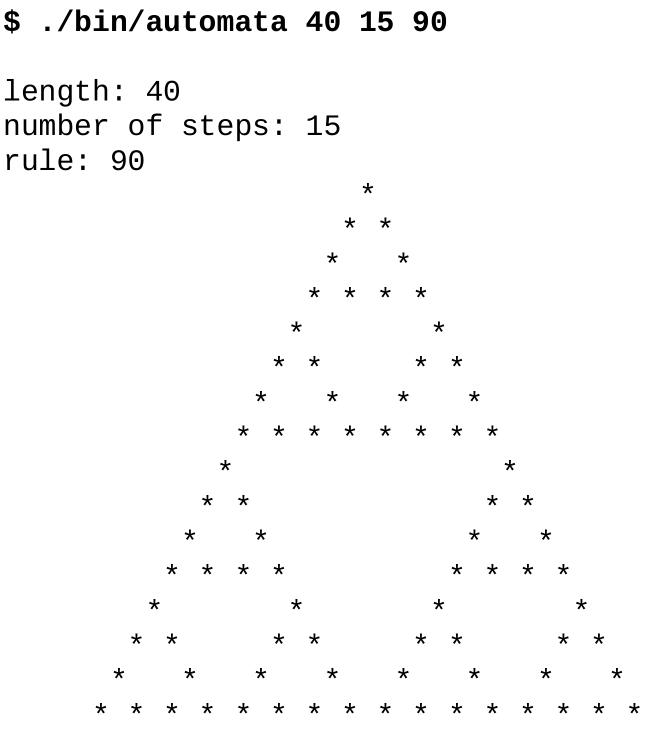
示例项目
示例项目的结构如下:
.
├── CMakeLists.txt
├── external
│    ├── CMakeLists.txt
│    ├── conversion.cpp
│    ├── conversion.hpp
│    └── README.md
├── src
│    ├── CMakeLists.txt
│    ├── evolution
│    │    ├── CMakeLists.txt
│    │    ├── evolution.cpp
│    │    └── evolution.hpp
│    ├── initial
│    │    ├── CMakeLists.txt
│    │    ├── initial.cpp
│    │    └── initial.hpp
│    ├── io
│    │    ├── CMakeLists.txt
│    │    ├── io.cpp
│    │    └── io.hpp
│    ├── main.cpp
│    └── parser
│        ├── CMakeLists.txt
│        ├── parser.cpp
│        └── parser.hpp
└── tests
    ├── catch.hpp
    ├── CMakeLists.txt
    └── test.cpp
我们将代码分成许多库来模拟真实的大中型项目:可以将源代码组织到库中,然后将库链接到可执行文件中。
项目源码
主要功能在 src/main.cpp 中:
#include "conversion.hpp"
#include "evolution.hpp"
#include "initial.hpp"
#include "io.hpp"
#include "parser.hpp"

#include <iostream>

int main(int argc, char *argv[]) {
  // parse arguments
  int length, num_steps, rule_decimal;
  std::tie(length, num_steps, rule_decimal) = parse_arguments(argc, argv);

  // print information about parameters
  std::cout << "length: " << length << std::endl;
  std::cout << "number of steps: " << num_steps << std::endl;
  std::cout << "rule: " << rule_decimal << std::endl;

  // obtain binary representation for the rule
  std::string rule_binary = binary_representation(rule_decimal);

  // create initial distribution
  std::vector<int> row = initial_distribution(length);

  // print initial configuration
  print_row(row);

  // the system evolves, print each step
  for (int step = 0; step < num_steps; step++) {
    row = evolve(row, rule_binary);
    print_row(row);
  }
}
external/conversion.cpp 文件包含从十进制转换为二进制的代码。我们在这里模拟这段代码是由 src 外部的 “外部” 库提供的:
#include "conversion.hpp"
#include <bitset>
#include <string>

std::string binary_representation(const int decimal) {
    return std::bitset<8>(decimal).to_string();
}
src/evolution/evolution.cpp 文件实现系统随时间的演化:
#include "evolution.hpp"

#include <string>
#include <vector>

std::vector<int> evolve(const std::vector<int> row, const std::string rule_binary) {
  std::vector<int> result;

  for (auto i = 0; i < row.size(); ++i) {
    auto left = (i == 0 ? row.size() : i) - 1;
    auto center = i;
    auto right = (i + 1) % row.size();
    auto ancestors = 4 * row[left] + 2 * row[center] + 1 * row[right];
    ancestors = 7 - ancestors;
    auto new_state = std::stoi(rule_binary.substr(ancestors, 1));
    result.push_back(new_state);
  }
  return result;
}
src/initial/initial.cpp 文件对行进行初始化:
#include "initial.hpp"

#include <vector>

std::vector<int> initial_distribution(const int length) {

  // we start with a vector which is zeroed out
  std::vector<int> result(length, 0);

  // more or less in the middle we place a living cell
  result[length / 2] = 1;

  return result;
}
src/io/io.cpp 文件包含一个打印行的函数:
#include "io.hpp"
#include <algorithm>
#include <iostream>
#include <vector>

void print_row(const std::vector<int> row) {
  std::for_each(row.begin(), row.end(), [](int const &value) {
      std::cout << (value == 1 ? '*' : ' ');
  });
  std::cout << std::endl;
}
src/parser/parser.cpp 文件解析命令行输入:
#include "parser.hpp"

#include <cassert>
#include <string>
#include <tuple>

std::tuple<int, int, int> parse_arguments(int argc, char *argv[]) {
  assert(argc == 4 && "program called with wrong number of arguments");

  auto length = std::stoi(argv[1]);
  auto num_steps = std::stoi(argv[2]);
  auto rule_decimal = std::stoi(argv[3]);

  return std::make_tuple(length, num_steps, rule_decimal);
}最后,tests/test.cpp 包含两个使用 Catch2 库的单元测试:
#include "evolution.hpp"

// this tells catch to provide a main()
// only do this in one cpp file
#define CATCH_CONFIG_MAIN
#include "catch.hpp"

#include <string>
#include <vector>

TEST_CASE("Apply rule 90", "[rule-90]") {
  std::vector<int> row = {0, 1, 0, 1, 0, 1, 0, 1, 0};
  std::string rule = "01011010";
  std::vector<int> expected_result = {1, 0, 0, 0, 0, 0, 0, 0, 1};
  REQUIRE(evolve(row, rule) == expected_result);
}

TEST_CASE("Apply rule 222", "[rule-222]") {
  std::vector<int> row = {0, 0, 0, 0, 1, 0, 0, 0, 0};
  std::string rule = "11011110";
  std::vector<int> expected_result = {0, 0, 0, 1, 1, 1, 0, 0, 0};
  REQUIRE(evolve(row, rule) == expected_result);
}
相应的头文件包含函数声明。有人可能会说,对于这个小代码示例,项目包含了太多子目录。但请注意,这只是一个项目的简化示例,真实项目通常每个库会包含许多源文件,理想情况下这些文件会被放到单独的目录中。
自底向上组织项目
让我们来详细解释一下 CMake 所需的功能。
我们可以将所有代码放到一个源文件中,不过每次编辑都需要重新编译,因此将源文件分割成更小、更易于管理的单元是有意义的。也可以将所有源代码都编译成一个库或可执行文件,但实际上项目更倾向于把源代码编译分成更小的、定义良好的库。这样做既是为了本地化和简化依赖项,也是为了简化代码维护。这意味着像本文这样由许多库构建一个项目是一种常见情况。
为了讨论 CMake 结构,我们可以从定义每个库的单个 CMakeLists.txt 文件开始,自底向上进行,例如 src/evolution/CMakeLists.txt:
add_library(evolution "")

target_sources(evolution
  PRIVATE
      evolution.cpp
  PUBLIC
      ${CMAKE_CURRENT_LIST_DIR}/evolution.hpp
  )

target_include_directories(evolution
  PUBLIC
      ${CMAKE_CURRENT_LIST_DIR}
  )
这些单独的 CMakeLists.txt 文件定义了各个库。本例中,我们首先使用 add_library() 定义库名,然后定义它的源文件和包含目录,以及它们的目标可见性:实现文件 evolution.cpp 为 PRIVATE,而接口头文件 evolution.hpp 定义为 PUBLIC,因为我们将会在 main.cpp 和 test.cpp 中访问它。把定义写在尽可能接近代码目标的位置,好处是对该库的修改只需要变更该目录中的文件即可;换句话说,库的依赖项被封装了起来。
向上移动一层,库在 src/CMakeLists.txt 中封装:
add_executable(automata main.cpp)

add_subdirectory(evolution)
add_subdirectory(initial)
add_subdirectory(io)
add_subdirectory(parser)

target_link_libraries(automata
  PRIVATE
    conversion
    evolution
    initial
    io
    parser
  )
这些文件在主 CMakeLists.txt 中被引用,整个项目就通过这些 CMakeLists.txt 文件构建起来。这种方法对许多项目都适用,并且可以扩展到更大型的项目,而不需要用一个跨目录的全局变量来保存源文件列表。add_subdirectory() 方法的另一个好处是它隔离了作用范围,因为子目录中定义的变量在父作用域中无法访问。
使用 add_subdirectory() 调用树构建项目的一个限制是,CMake 不允许将 target_link_libraries() 与定义在当前目录范围之外的目标一起使用。对本示例来说这不是问题。下一篇我们将演示另一种方法:不使用 add_subdirectory(),而是使用模块 include 来组装不同的 CMakeLists.txt 文件,它允许我们链接到当前目录之外定义的目标。
依赖关系图可视化
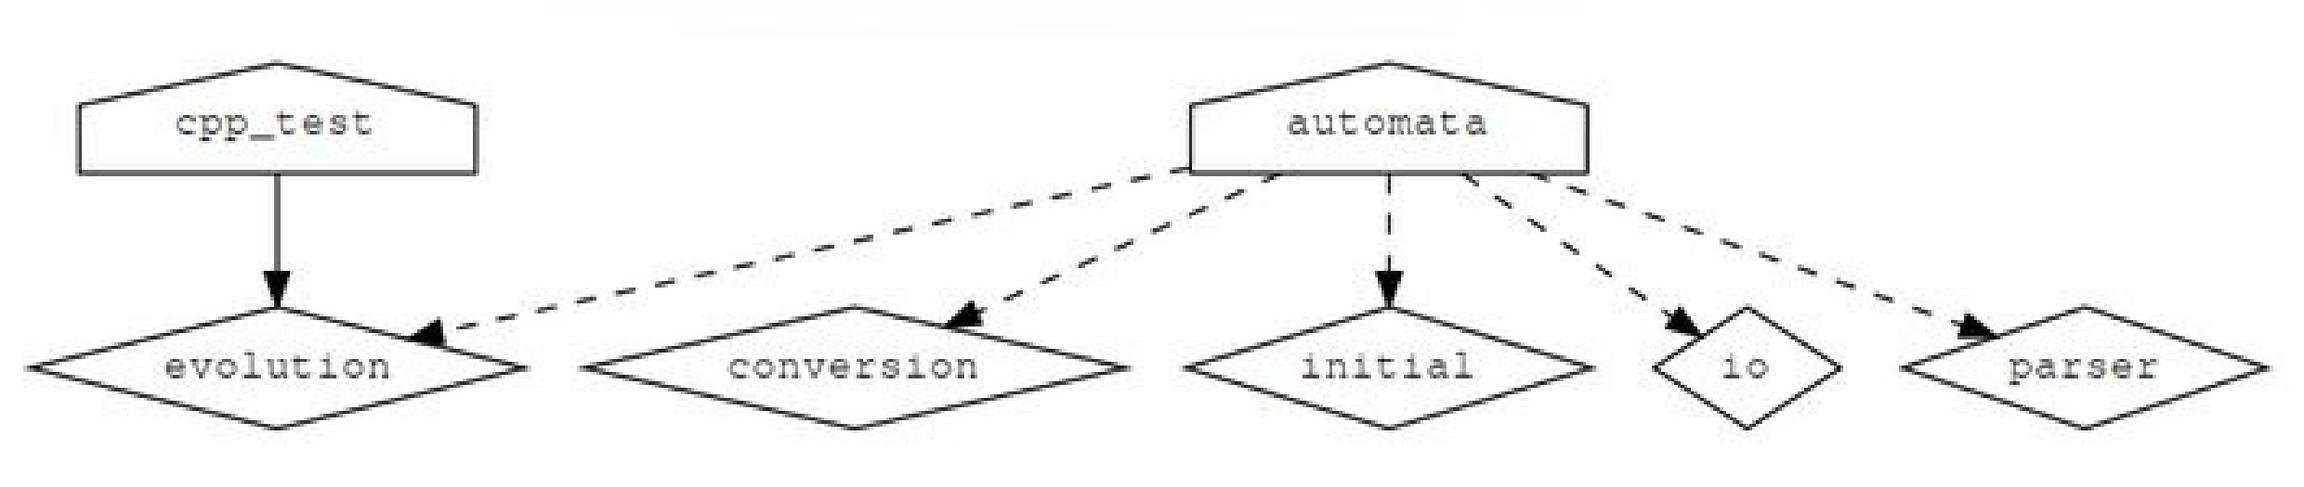
CMake 可以使用 Graphviz 图形可视化软件生成项目的依赖关系图:
$ cd build
$ cmake --graphviz=example.dot ..
$ dot -T png example.dot -o example.png
生成的图表将显示不同目录下的目标之间的依赖关系:
防止源内构建
到目前为止,我们都是在源代码目录之外构建代码,以保持源代码树和构建树分离。这是推荐的方式,它允许我们使用相同的源代码配置不同的构建(串行的或并行的、Debug 或 Release),而不需要复制源代码,也不会在源代码树中生成目标文件。使用以下代码片段,可以保护您的项目免受源内构建的影响:
if(${PROJECT_SOURCE_DIR} STREQUAL ${PROJECT_BINARY_DIR})
    message(FATAL_ERROR "In-source builds not allowed. Please make a new directory (called a build directory) and run CMake from there.")
endif()
认识到构建结构与源结构类似很有用。本例中,在 src/CMakeLists.txt 中插入一条 message 打印输出:
message("current binary dir is ${CMAKE_CURRENT_BINARY_DIR}")在 build 下构建项目时,我们将看到打印输出 build/src。
CMake 3.12 中的 OBJECT 库
在 CMake 的 3.12 版本中,OBJECT 库是组织大型项目的另一种可行方式。对我们的示例来说,唯一的修改是在库的 CMakeLists.txt 中:源文件将被编译成目标文件,既不存档到静态库中,也不链接到动态库中。例如:
add_library(io OBJECT "")

target_sources(io
  PRIVATE
      io.cpp
  PUBLIC
      ${CMAKE_CURRENT_LIST_DIR}/io.hpp
  )

target_include_directories(io
  PUBLIC
      ${CMAKE_CURRENT_LIST_DIR}
  )
主 CMakeLists.txt 保持不变,automata 可执行目标会将这些目标文件链接到最终的可执行文件中。使用时也有需要注意的地方,例如在对象库上设置的目录、编译标志和链接库将被正确地继承。有关 CMake 3.12 中引入的对象库新特性的更多细节,可以进一步查阅 CMake 官方文档。